EENG 383
Small DC motor and driverA DC motor is a 2 terminal device. When a voltage is applied across the terminals of the motor the output drive shaft rotates. If the voltage across the terminals is reversed then the output drive shaft rotates in the opposite direction. DC motors are a reversible system. That is, if you rotate the drive shaft then a potential difference will appear across the terminals. Schematically a motor is represented as a circle with the letter M inside it. Below is an image of the DC motor that we will be using in this lab. The only notable exception is that our DC motors have pig tails soldered onto them.

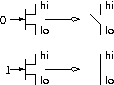
An H-bridge is a circuit which allows a relatively low voltage/low power circuit (our PIC) to control a relatively high voltage/high power device (our DC motor). In order to do this the H-bridge must be built around some sort of amplifier circuit. In many cases these amplifiers are field effect transistors, FETs for short. A FET has three terminals, called the base, emitter and collector. To simplify matters, a FET is an electrically controlled on/off switch. The switch setting is controlled by the voltage on the base. The terminals of the switch are the collector and emitter. The base controls whether there is a short circuit or open circuit between these two terminals. The figure below shows a hi voltage on the collector and lo voltage on the emitter. The logic level on the base opens and closes the switch as shown.
So how can you use FETs to build an H-bridge? Well it takes four FETs to build an H-bridge, and you must arrange them as shown in the left hand side of following figure.
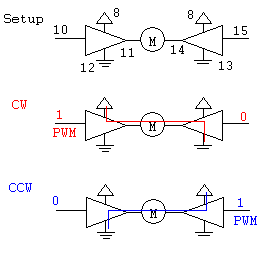
Whats going on in this figure? Well there are three things that could be happening depending on the values of the A and B signals. Lets consider that would happen if A=1 and B=0. Well the FETs corresponding to the A inputs would become wires. The FETs corresponding to the B inputs would be open circuits. This would then force current to flow through the motor in the direction indicated by the blue arrow causing the motor to rotate. Switching the polarity of the inputs to A=0 and B=1 would cause current to flow in the direction indicated by the red arrow, causing the motor to spin in the opposite direction. Finally, setting both A=0 and B=0 will cause all four FETs to behave as open circuits cause no current to flow through the motor, turning it off.
The H-bridge you will be using in this lab is the Texas Instruments SN754410 Quadruple Half H Bridge Driver. The technical documents can be found on the TI web site at the following link: http://www.ti.com/lit/ds/symlink/sn754410.pdf. There are a few points that are worth mentioning with respect to this chip. First, the symbol typically used for a FET is replaced in the technical documents by a triangular buffer symbol. This buffer behaves somewhat differently from the FET. When enabled, the buffer magnifies the input. That is, when enabled the buffer amplifies a logic 1 input to a 12v output and a logic 0 input to ground. When the buffer is not enabled, its output is tristated. If you don't remember, an output which is in the tristate configuration is essentially an open circuit. Second, the buffers are separated into pairs. Each pair of buffers has an enable line which allows the output to be tristated. You will have to figure out how to use these tristate lines to keep the sides of the H-bridge from stepping on each other toes.