EENG 383
Lab 7 - IR Transmit| Lab: | 7 |
| Status | Live |
InLab 7
Some self guided activities.Lab 7 assignment
This weeks assignment will require you to complete the transmission ISR to send a complete data packet consisting of a source address, destination address, a NULL terminated message and checksum.Software
The message format of this week's lab adds two extra bytes to the front of the message, a Source Address and Destination Address as shown in the image below. You will provide the capability for the user to enter in both of these addresses through special functions in main. After these two addresses, comes the NULL terminated plain text message being sent. This is followed by a checksum which is the sum, modulo 256, of all the characters in the message including the source and destination addresses.
You do not have to change any of last week's code to receive this revised message format; your receive function doesn't care what the bytes mean, just that there is one character after the NULL character. As a consequence, you'll keep the same global variables for the EUSART2 ISR functions as well as the same ISR.
This week, you will write an TMR1 ISR to send the message shown in the image above. To do this you will need the TMR1 ISR prototype (same as that given to you inLab), a global transmit array and some flags shown in the following declaration.
void myTMR1ISR(void);
char transmitIRBuffer[MAX_BUFFER_SIZE];
uint8_t transmitStart = false;
uint8_t transmitBusy = false;
uint16_t bitPeriodInTMR1Counts = 13333;        // 1200 Baud default
You should also use the and enum statement to create a datatype for the state variable as done in the inLab.
The ISR will send one character at a time from transmitIRBuffer using the ideas represented in the state diagram shown below. In this diagram, the TMR1 ISR starts in the TX_IDLE state. In this state, TMR1 is configured to periodically rolls over, causing the TMR1 ISR to run. If main has set the transmittStart flag true, the TMR1 ISR will transmit every byte in the transmitIRBuffer, one bit at a time.
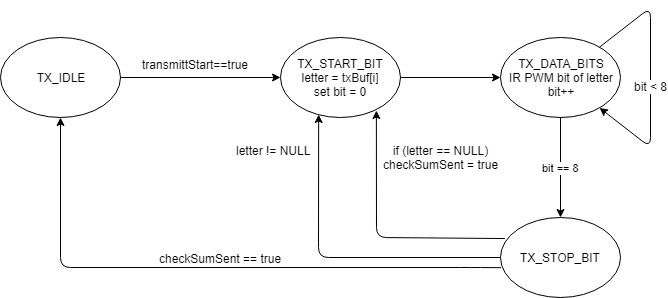
To send a byte of the transmitIRBuffer, the TMR1 ISR first asserts a logic 0 start bit on the IR decoder in the TX_START_BIT state. TMR1 ISR does this by calling EPWM2_LoadDutyValue(LED_ON), changing state to TX_DATA_BITS and initializing some variables.
The TMR1 ISR will be invoked 8 times in the TX_DATA_BITS state. Each time it's invoked, the TMR1 ISR will call EPWM2_LoadDutyValue with a duty cycle corresponding to the current bit (starting at the LSB) of the letter being sent. When sending the eighth bit, the TMR1 ISR changes state to TX_STOP_BIT.
When the TMR1 ISR is in the TX_STOP_BIT state, it should asserts a logic 1 stop bit on the IR decoder by calling EPWM2_LoadDutyValue(LED_OFF). Then the TMR1 ISR needs to check if the letter just sent was NULL. If it was, then the TMR1 ISR should set a local flag, telling itself that the next letter sent is the checksum. If the the TMR1 ISR just sent the checksum and it is in the TX_STOP_BIT state, then it has completed sending the transmitIRBuffer and should set transmitBusy and transmitStart flags to correct values. On the other hand, if there are still characters to transmit, then thr TMR1 ISR start should be set to TX_START_BIT to transmit the next letter in the message.
uint8_t userEnter8bit(void)
You will need to allow the user to enter in the source and destination address. These addresses are 8-bit values between 0 and 255. The userEnter8bit function prompts the user to type in numbers and hit return (the '\r\' character) when done. If the user enters a ASCII value between '0' and '9', inclusive, then add it to 10 times the current sum. You can ignore ASCII characters outside this range. When the user enters 'r', return the sum computed. You should echo back valid numbers that the user enters so they have confirmation of what they just typed. You do not have to do any error checking on the range of entered values, trust the user and enable them to mess things up.
void decodeIntoASCII(char msg[])
When debugging my program I found it really useful to write this helper function. The decodeIntoASCII function prints every character in the message format in decimal, hex and ASCII using a statement like:
printf(" %2d: %02x %c\r\n", msgIndex, msg[msgIndex], msg[msgIndex]);
User Interface
-------------------------------------------------
TX msg: This is a test
My identity: 1
TX address: ff
receiveNewMessage = false
2400 Baud
-------------------------------------------------
?: help menu
o: k
Z: reset processor
z: clear the terminal
b: set Baud rate
m: create a NULL terminated message with SRC and DEST prefix.
s: set Source transmit identity
d: set Destination transmit target
S: Send message using TMR1 ISR
R: Receive message using EUSART2 via IR decoder
M:  Monitor all IR traffic.
x/X: decode tx/RX message.
-------------------------------------------------
The top of the menu prints out a lot of useful status information. During initialization of your system and before the infinite loop, initialize transmitIRBuffer. Use the initialized source and destination addresses with an empty message body, NULL and checksum. This way, the menu will have something to work with if the user types '?' before forming a message with the 'm' command.
- ?
- Prints out the ever useful help menu.
- o
- Just to check that everything is working ok.
- Z
- Reset the processor so that we can see that splash screen.
- z
- Clear the terminal using a bunch of new lines.
- b
- Allows the user to adjust the Baud rate of the send and received characters. It does on the receive side by setting the SPBRGH2:SPBRGH register pair. It does this by setting the bitPeriodInTMR1Counts global variable used by the TMR1 ISR.
- s
- Prompts the user to enter in an, up to 3 digit, source address. It calls the userEnter8bit(); function and stores the return value in a variable that is used to build the transmitIRBuffer.
- d
- Prompts the user to enter in an, up to 3 digit, destination address. It calls the userEnter8bit(); function and stores the return value in a variable that is used to build the transmitIRBuffer.
- S
- This command sends out transmitIRBuffer using TMR1 ISR.
Transmitted Message: This is a test Checksum computed: 245 Sender address: 1 Target address: 255 - R
- This command checks the receiveNewMessage flag and prints out
receiveIRBuffer using the format below if the flag is true.
Received
    Message:            This is a test
    Checksum computed:  245
    Checksum received:  245
    Sender address:     1
    Target address:     255
If the receiveNewMessage flag is false then this command should print outNo message, receiveNewMessage = false
- m
- This command is very similar to the 'm' command in the previous lab with one exception. Well two exceptions actually, the first two bytes of the message should be the source address (byte 0) and destination address (byte 1). The message should be NULL terminated and followed by the one byte checksum. While entering the message, the code should monitor the number of characters typed and not allow it to exceed MAX_BUFFER_SIZE.
- M
- This command allows the user to monitor all the IR traffic
detected by the IR decoder. It does this by monitoring the
receiveNewMessage flag and prints out the information in the
message when true. At any time the user should be able to exit
this mode by pressing any key.
Hit any key to exit
SRC DEST    CHECK   MESSAGE
  1  255      245   This is a test
- x/X
- This command uses the decodeIntoASCII function to
print out the transmitIRBuffer or receiveIRBuffer. Example
output for 'x' looks like the following.
TX buffer contents
     0:     01
     1:     ff    ▒
     2:     54    T
     3:     68    h
     4:     69    i
     5:     73    s
     6:     20
     7:     69    i
     8:     73    s
     9:     20
    10:     61    a
    11:     20
    12:     74    t
    13:     65    e
    14:     73    s
    15:     74    t
    16:     00
    17:     f5    ▒
If you didn't get the previous lab working?
If you did not get the previous lab working, you can still complete this lab by transmitting your characters in the foreground instead of using an interrupt. Do this by replacing your send function with the following code. Now all that you need to do is get myTMR1ISR to transmitt the message correctly when the global transmitStart flag is set true.
                    //--------------------------------------------
                    // Send a string over IR
                    //--------------------------------------------
                case 'S':
                    // For the foreground version, we will read in the
                    // the characters as they are sent.  Make sure that
                    // Make sure EUSART2 Interrupts is UNCHECKED in MCC

                    // Since EUSART2 is double buffered, clear out any garbage
                    if (EUSART2_DataReady) (void) EUSART2_Read();
                    if (EUSART2_DataReady) (void) EUSART2_Read();

                    transmitStart = true;      // Tell the TMR1 ISR to TX
                    uint8_t rxBufferIndex = 0;

                    do {
                        while (PIR3bits.RC2IF == 0);
                        recieveIRBuffer[rxBufferIndex] = RCREG2;
                    } while (recieveIRBuffer[rxBufferIndex++] != '\0');
                    while (PIR3bits.RC2IF == 0);
                    recieveIRBuffer[rxBufferIndex] = RCREG2;
                    receiveNewMessage = true;

                    printf("Transmitted\r\n");
                    printf("    Message:            %s\r\n", transmitIRBuffer + 2);
                    printf("    Checksum computed:  %d\r\n", transmitChecksum);
                    printf("    Sender address:     %d\r\n", transmitSourceAddr);
                    printf("    Target address:     %d\r\n", transmitDestinationAddr);
                    break;