Notice
the gwv.pdf file that you can refer to for directions on how to use GWV.
It will be most useful if you follow along with your copy
of GWV on your computer.
Open GWV on your computer
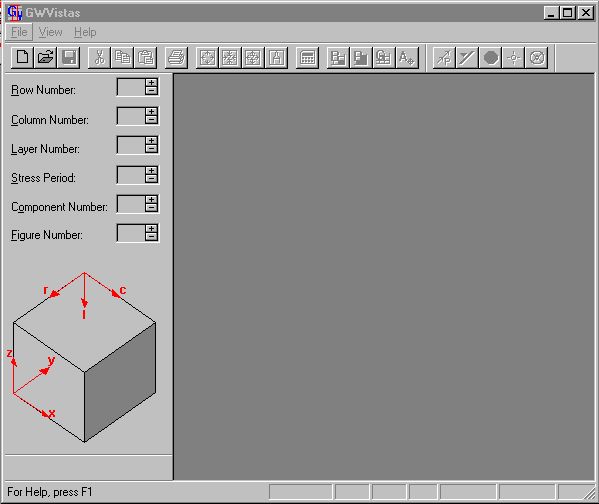
Select File>New
or
Click on the New Document button 
Set global parameters to initialize the model input.
#
rows 30
#
columns 30
x
spacing 330ft
y spacing 220ft
#layers 3
bottom elevation 0.
top elevation 150.
# stress periods 1
change Kz to 10ft/d
change recharge rate to 0.002 ft/d
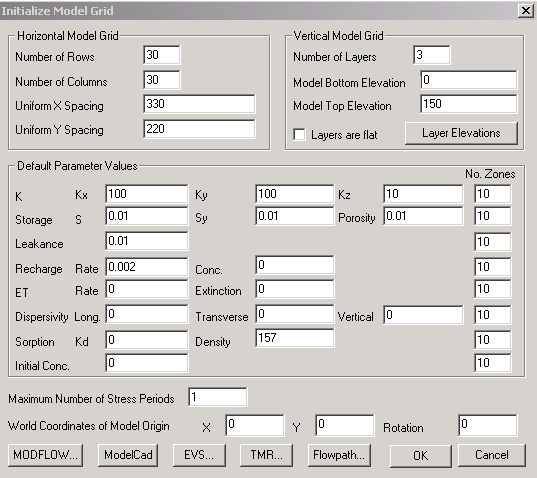
You could set other global values at this time as well. Look
over the screen to get an overview of global values that can be set here.
Click OK
Select View>Full>Screen
Adjust your window size as desired. Your grid should look like this
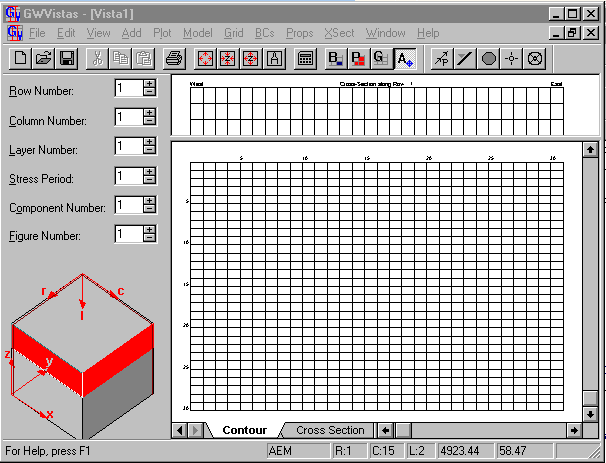
Change the font size for the row and columns
- Select Grid>Options>Font
- Set the font to 16
- Select OK
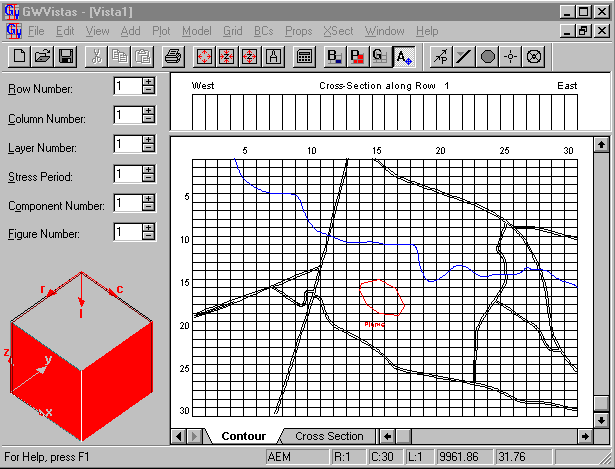
Import a base map by
- Selecting File->Map->GWVistas
- Choose the map called t2.map
in the GWV tutorial directory or get it here t2.map
- Select View->Full->Screen to fit everything back
in the GWV window
GWV has four modes
- Analytic Elements

-
- define and alter grid-independent boundary
conditions
Grid 
-
- add, delete, and move rows, columns,
and layers
Boundary condition 
-
- edit grid-dependent boundary
Property zones 
-
- assign physical properties (e.g., hydraulic
conductivity) to each cell
You can select these from the Edit menu where
the active option is checked
or
use the button on the tool bar
Buttons on the right side of the toolbar change for each
mode
For Boundary
conditions
options include 
insert and delete windows, insert polyline or polygon, and options
For
Properties
options include 
default zone, zone window, digitize polygon, transpose zones, and zone
database
For
Grid
editting
options include 
delete rows, insert rows, delete columns, insert columns, and grid options
For
Analytical
Elements
options include 
particale trace, line boundary, circle boundary, target, well
To insert, move, and delete rows, columns, and layers, you must be in ōgridö mode.
- The cursor behaves differently in grid
mode.
- When you are close to a row or column
grid line, the cursor changes shape to either a left-right or up-down arrow.
- Pressing the left mouse button when this cursor appears
allows you to slide the row or column line to a new position.
- You may insert or delete rows, columns,
and layers using the menu commands.
- In Grid mode the right mouse button inserts
a row or column into the model or deletes the nearest row or column, depending
on the current grid operation (shown at the bottom of the Grid menu and as
a depressed button).
Add two rows and two columns to the model.
- Enter Grid mode
- Split row 15 into two new rows by placing
the cursor anywhere within row 15 and click the right mouse button
- Repeat this procedure for the next row
to the south (Row 16 of the original model)
- When you insert a row or column, the default
behavior is to split the current cell in half.
- You may change the way rows/columns are
inserted by selecting Grid-> Options.
- Split columns 14 and 15 just like rows
15 and 16 above
Select Boundary Conditions
Add a column of constant heads along the left edge of the
model in layer 1.
- To set a large number of boundary conditions,
- Select BCs->Insert->Window
- The cursor will change shape and appear
like a mini-finite-difference grid
- Move the cursor to the upper left corner
of the model (row 1, column 1) and press the left mouse button.
- Hold the mouse button down and move the
cursor to the lower left corner (row 30, column 1).
- Release the mouse button and a dialog appears
to confirm the coordinates of the window that you just created, press OK to
accept these coordinates.
- A constant head dialog appears.
- Change this value of constant head to
150 ft.
- Notice that the boundary condition is
steady-state. This means that the boundary cells will be active during the
entire simulation. In this version of MODFLOW, constant heads are active for
the entire simulation and cannot be changed.
- The constant head cells will appear blue
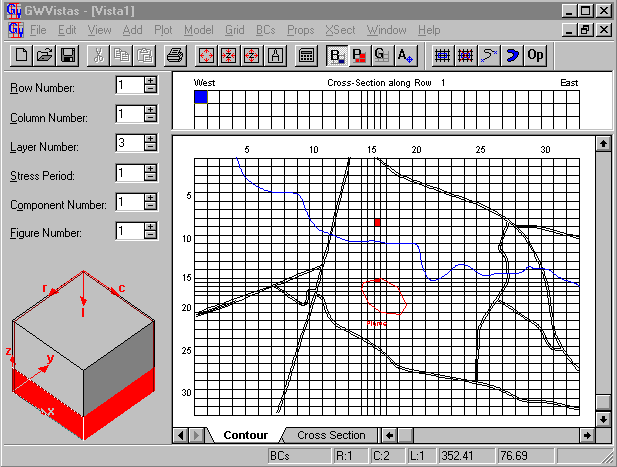
Now, add two wells in the bottom layer (layer 3) of the model.
- Move to layer 3 of the model.
- The easiest way to change layers is by
clicking the ō+ö button next to ōLayerö on the 3D cube
(called the Reference Cube) that is on the left side of the screen.
- Select BCs->Well
- Move the cursor to row 16, column 15 and
click the left mouse button.
- You will notice that as you move the cursor
on the screen, the status bar at the bottom of the screen updates the current
row and column.
- When you are at row 16, column 15 the
status bar should read ōR:16 C:15ö.
- After clicking the mouse button, a well
edit dialog will appear.
- Enter a flow rate of -30000 ft3/d
- GWV assumes that units of length and time
are consistent for all parameters. In this example, all length units are in
feet and all time units in days.
- Add another well at row 8, column 16. This
time, enter a flow rate of -40000.
The model definition is complete, so
move on to define MODFLOW specific features, create MODFLOW files, and execute
MODFLOW
MODFLOW specific settings, file creation and execution
Post Processing
View results of MODFLOW execution
Calibration
GWV calibration features
Editing a model in GWV
GWV editing features
Take some time to visit each MODFLOW package
in this GWV example problem. As you look at the data in GWV, find the MODFLOW
file for that package on your disk and view it in a text editor. If there are
any items that you do not understand, please ask me about them by e-mail.
There are a number of GWV
assumptions and constructs that influence how you build your model
Read GV Concepts on page 29 of the manual.