Homework 4 - Bézier Curves
This assignment is due by September 20, 2012 by 11:59pm.
Part I - Curvacious!
For this assignment, you are to write an OpenGL/GLUT application that parses a file and renders cubic Bezier curves in 3D. The input to your program will be a set of control points stored in a file, which is to be specified to your executable as a command line argument, e.g.:
./hw4 controlPoints.csv
The control points text file itself will consist of a line which contains a single integer specifying the total number of control points in the file ( N). The next N lines will be of the form x,y,z where X, Y, and Z are floating-point comma-separated values that specify the world-space position of a control point. The points are specified in order from the first control point to the last. An example control points file can be found here.
Your program will then render a cubic Bezier spline based on those control points - evaluating the spline at varying values will result in a series of points along the spline, and you will connect those points with straight lines, using GL_LINES or GL_LINE_STRIP. If you evaluate the curve at enough points, it will appear smooth. You will be guarenteed to have N = 1 + 3m control points in a file, for some value of m. For N = 4, the spline will be a single cubic Bezier curve. For N > 4, you will have a Bezier spline with m different cubic Bezier segments. The resulting Bezier spline will be C 0 continuous, but may or may not be C 1 continuous depending on the control points.
Move along, keep on moving.
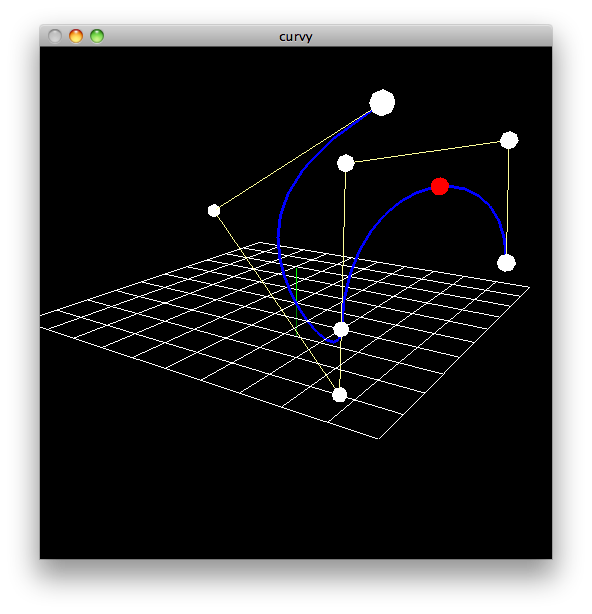
Your program must feature a grid of some sort to provide the user with a sense of scale and perspective. You must plot the "control cage," the edges between control points, with a light yellow line, and plot the Bezier spline itself with a blue line. You must also draw small, solid spheres at the control points. Finally, animate a sphere (or your vehicle from hw3!) continuously moving along the spline. When the sphere reaches the end of the spline, have it jump to the beginning of the spline and repeat indefinitely.
The camera can follow any camera model (freecam or arcball cam) you like. The camera must be set up as its own class with the nine lookAt parameters as members. The class definition should be in its own camera.h file with the implementation in a corresponding camera.cpp file.
Lastly, connect a pop-up menu to the middle mouse button that provides options to the user. At a minimum, it must include a "Quit" option which closes the program. The user may still press ESC as in prior assignments to close the program as well.
You will be using Bezier curves as part of your midterm project, so it's a good idea to write your functions as generally as possible (e.g., have a function that takes 4 controls points and an interpolant as input and returns the corresponding point on the curve, and a similar function for the entire spline). It might be helpful to define your own ControlPoint class which has the necessary (x, y, z) information. Then define a Bezier class that contains four ControlPoints.
Part II - Pick Your Curve, Any Curve
This section is extra credit for students enrolled in CSE40166
and is required for students enrollred in CSE60166.
Creating a Bezier curve that is C 1 continuous can be cumbersome and tedious if defining points by hand. Instead of calculating the precise (x, y, z) locations, it would be easier if we could move control points into place in real time. In this section, you will need to implement picking to move the control points.
You can pick your friends; you can pick your nose; but ...
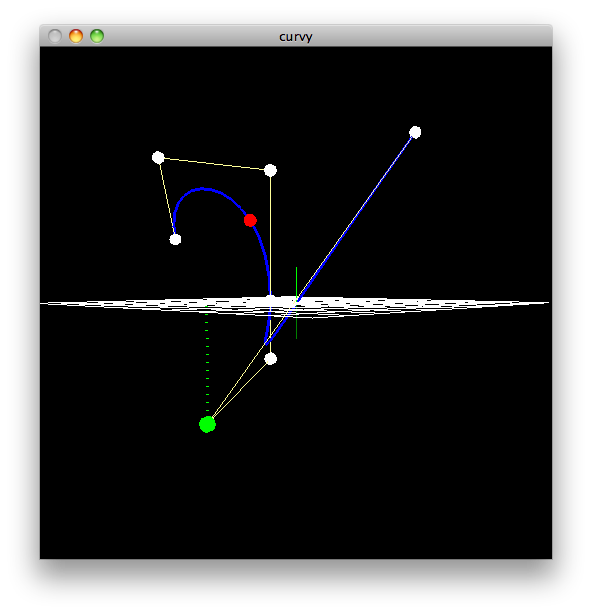
If the user Shift+Left clicks on a control point, then this action should pick the closest control point in view. The currently picked control point should change colors to signify that it is the active control point. In addition, when a control point is picked a perpendicular should be dropped to the XZ-plane where Y=0 to give a sense of height (use of line stipple is encouraged). The user can then move the active control point along the X, Y, and Z axes. Updating a control point wil then update the Bezier curve as necessary. The user can select a new control point to modify by Shift+Left clicking on a different control point. If the user Shift+Left clicks on something other than a control point, then no point should be active.
Finally, in order to not lose all the work done by positioning control points, the user can save the current control point values to a new control point file (with the same format) by either a keypress or a menu option (don't worry about prompting for a filename, you can save to a hard coded filename - or you can use GLUI if feeling ambitious).
Part III - Website
Update the webpage that you submitted with HW3 to include an entry for this homework assignment. As usual, include a screenshot (or two) and a brief description of the program, intended to showcase what your program does to people who are not familiar with the assignment.
Part IV - Questions
Briefly answer the questions below. Include your response in the README.txt file.
- From Object-Oriented perspective, how would it best to set up our class structure? Do we want every primitive supported by OpenGL to have its own class (Point, Line, Triangle, Triangle_Strip, Quad, etc)? Do we want to create classes for primitives not supported by OpenGL (Circle, Ring, etc)?
- If we were to design a Point class: we would want to store the X, Y, Z coordinates with the class. What other values would we want to support and what other functions/methods could we add?
Documentation
With this and all future assignments, we expect you to appropriately document your code. This includes writing comments in your source code - remember that your comments should explain what a piece of code is supposed to do and why; don't just re-write the code says in plain English. Comments serve the dual purpose of explaining your code to someone unfamiliar with it and assisting in debugging. If you know what a piece of code is supposed to be doing, you can figure out where it's going awry more easily.
Proper documentation also means including a README.txt file with your submission. In your submission folder, always include a file called README.txt that lists:
- Your Name / netID
- Homework Number / Project Title
- A brief, high level description of what the program is / does
- A usage section, explaining how to run the program, which keys perform which actions, etc.
- Instructions on compiling your code
- Notes about bugs, implementation details, etc. if necessary
Grading Rubric
Your submission will be graded according to the following rubric:
|
| 10% | Control points are read in from file correctly. (Your program will be tested against two new control point files that we provide) |
| 12.5% | Bezier curve is evaluated correctly. |
| 12.5% | Bezier curve is drawn correctly. |
| 10% | Control vertices of the Bezier spline are drawn correctly. |
| 10% | Control cage is drawn correctly. |
| 10% | Animated point moves correctly along curve, jumps back to start at the end of the spline, and repeats this process indefinitely. |
| 15% | Camera class defined in separate camera.h file and implementation provided in accompanying camera.cpp file. |
| 5% | Camera follows arcball cam or freecam model. Left mouse button controls view. If using arcball cam, right mouse button controls zoom. |
| 5% | Pop-up menu attached to middle mouse button. Quit is listed as an option. |
| 2.5% | Questions from Part IV are answered and included in the README.txt file. |
| 5% | Submission includes source code, Makefile, and README.txt.
Source code is well documented. Webpage named <afsid>.html submitted and updated with screenshot from latest assignment. |
| 2.5% | Submission compiles and executes in the lab machine environment. |
Part II Grading Rubric
- For students enrolled in CSE40166: This section will count as an additional 1% of your final course grade, with the 1% being broken down as follows.
- For students enrolled in CSE60166: This section will count as an additional 50 points, with the 50 points being broken down as follows.
|
| 50% | Shift+Left Click picks the control point closest to the viewer. |
| 5% | Active control point changes colors as a visual notice that it is active. |
| 5% | Active control point has a perpendicular drawn to Y=0. |
| 5% | Active control point can be moved along the X, Y, and Z axes. |
| 15% | Bezier curve is updated as active control point is moved. |
| 10% | Shift+Left Click on anything but a control point causes no point to be active. |
| 10% | Control point positions are saved to a new control point file. |
Submission
Please update your Makefile so that it produces an executable with the name hw4. When you are completed with the assignment, submit the source code, Makefile, and READEME.txt to the following directory:
/afs/nd.edu/coursefa.12/cse/cse40166.01/dropbox/<afsid>/hw4/
Similarly, title your webpage <afsid>.html (e.g. jpaone.html) and submit it to:
/afs/nd.edu/coursefa.12/cse/cse40166.01/dropbox/<afsid>/www/
Place any screenshots or other images used on the webpage in:
/afs/nd.edu/coursefa.12/cse/cse40166.01/dropbox/<afsid>/www/images/
This assignment is due by September 20, 2012 by 11:59pm.
|